Friday, May 25, 2012

Flowers & Herbs


Last Saturday I woke up early and went down to the St. Paul Farmers Market for the the first time this season. It was bustling with people and flowers and herbs. And of course rhubarb and asparagus and other early season veggies here in the great north. It was quite a site. The flowers were remarkable. Everywhere you looked people were taking photos of the grandeur of it all. I picked up two beautiful baskets of hanging petunias for either side of our back door. They add lots of cheer to the back yard and I loooove them!

In addition the to the two baskets, I also bought herbs to fill the herb garden between the strawberry patch and our massive rhubarb plant. 3 basil plants, rosemary, cilantro, thyme, sage and lavender.


All of these I also grew last year, with the exception of the lavender. I am determined to get lavender in our yard, and since it didn't work to start from seed I just picked a little guy at the market.

I didn't worry to much about how they were going to be placed in the garden. I just set them down and made sure there was good spacing between them to give them room to grow. Then I rearranged a bit. I put the basil plants closest to the door, because, lets be honest, those are the ones I'm going to be going at the most. Henec the fact that I put in THREE plants.


And I gave the lavender a big spacious spot in the back.


The remaining herbs (sage, cilantro, thyme and rosemary) were put in between the basil plants and the lavender. The only consideration I made here was to put the sage by the rosemary because I thought the silver of the sage would look nice next to the purple of the lavender. 


Here is the herb garden in all of it's newly planted glory. You will notice (with the help of some text) that I have also trans-planted a little hasta that was barely surviving at our fence line. And our chives from last year came up on their own this year. Back at the fence line I am going to grow two types of beans. It might not look like there is room in this picture but...


If you look from here, you can see that this is the PERFECT place to cram a few more veggies in. If you ask me, fresh garden beans are second only to tomatoes. So the more the merrier.


Have a lovely memorial day weekend! I hope to be back again, sooner than later, but no promises. 

Wednesday, May 16, 2012

Mid Century Chair

You may recall that the husband and I took a vacation back in February to Florida. (If not, feel free to follow the hyperlinked "Florida" for some best of the best pictures from our trip. Yes, I am being overly obvious by stating what a hyperlink is after I have given you a hyperlink.) One thing I did not mention in that post - actually I didn't mention a lot of things in that post -- was that I fell in love during our trip. I didn't mean for it to happen, but it was a love at first site sorta thing and one thing led to another and I bought a piece of furniture!

Yes, I fell in love with a chair. And now, three months later, and several thousand miles in various vehicles (my mother drove it from FL to IL, we drove it from IL to MN) it is finally sitting in our living room. And I still LOVE the sh*t out of it. See for yourself. I think she looks damn good in our living room.


Check out those legs, eh? Aren't they sexy! And the way she ever so gently curves at her midsection. Oh dear! Moral of the story. White chair is to Amber, what blue chair is to Chris.

If you are ever in the Fort Meyers area of Florida, i suggest you stop by the Swamp Shop and see if they have anything you might like. We paid $157.94 for this chair, it was a HUGE splurge for us. But seeing her in our living room, I know it was the right choice.


Friday, May 11, 2012

Diggin' in the dirt

We are about to hit the road, head south, and do some celebrating over this fine Mother's Day weekend. But before we go I thought I stop in with some exciting news. I transplanted my seedling last night!

Here you see a garden bed with Lettuce, Kale, Spinach & Mesclun greens...
Here you see the same garden bed but this time it also five tomato plants (3 Roma, 1 Big Boy, 1 Black Pearl) and south of that line of string is a row of Brussels Sprout seeds. There are also two incredibly tiny, nearly invisible marigold plants in this bed. Turns out I am not so good at starting flowers from seed. 
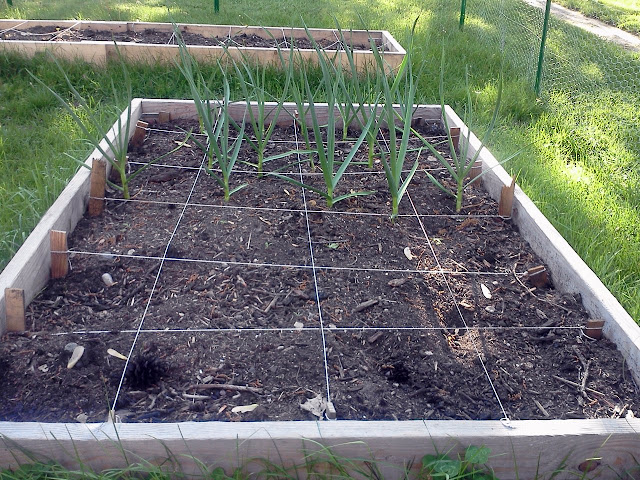
Here you see garlic...
But here you see garlic AND (from left to right) 3 jalapeno plants, 3 bell pepper plants. In the bottom right corner I have also seeded two types of cucumbers. 

Oh the excitement! Oh the joy! Let summer begin. Happy Mother's Day!!! Be sure to give your mama a big kiss & tell her how amazing she is.

Wednesday, May 9, 2012

House Tour


I have finally started the House Tour page of Luminous Home. It ain't much yet, but if we haven't had the honor of having you over yet, then this is at least a starting point. 

Tuesday, May 8, 2012

Rhubarb: Harvest, Eat, Drink & Be Merry.

My tomatoes may not be planted yet but my rhubarb is ready to be eaten.

How does one know when rhubarb is ready? Well, generally you know its ready to be picked when the plant is so huge it starts to look cramped. If the under leaves don't have anywhere to grow and yellow before they mature that means you need to get on with pulling the stalks already. Oh and it's spring, rhubarb can be harvested from spring, once its full grown, through summer...that is if you aren't sick of it by the end of summer.

If you have never done it before, harvesting rhubarb is really easy, I promise.  As soon as it is grown you can harvest it. Don't worry if the stalks are not bright red, they can be pink or even a bit green, that has more to do with the age of the plant than it's edibility (that is my understanding anyway, someone please correct me if I am wrong). My rhubarb has never been all bright and red like the stuff you get at the farmers market, but it tastes the same. You do want it to be firm, don't pull the flimsy guys, they aren't ready yet. Also, Rhubarb should not be pulled the first year, as it needs time to dig in its roots.

You can harvest up to half of your plant at one time but not more! As with all veggies, the more often you harvest the bigger and fuller it will get it. I harvested this weekend and I'll probably be able to do so again within two weeks.

To actually harvest the stalks, grip near the base of the stalk and move it around in a bit of circle to loosen it while firmly pulling up. The stalks should pull out with a nice "pop" sound and be fully intact. Broken stalks can cause infection to the plant, so make sure to get any of the broken bits out if the stalks don't come out nice and clean. Here is a little video I took on my phone so you can see how to pull out the stalks nice and clean.

Cut off the leaves, they are poisonous! and trim the ends. That's all there is to it! Am I forgetting anything? Do you have any questions about this process that I haven't answered? Here is the bounty of my first harvest, nearly a whole sink full. As you can see in this photo I have trimmed the leaves but I have NOT cut off the ends yet.

The next question is obviously, what to do with it? And truly the options are endless. I've made crisps and cobblers and jams and chutneys. I try and find new ideas regularly, which is why I decided this time around that I would make a Rhubarb Liqueur. Yeah, I know, delicious...if you like that kind of stuff. 


Here is the part where I share the details, should you also be interested in making some Rhubarb Liquor.
1. Fill a quart size mason jar with chopped up rhubarb.
2.  Mix 6 tbs of sugar and 1/4 cup of water on the stove over medium heat until it becomes sugar water.
3. Pour the sugar water over the rhubarb.
4. Add 1 cup of Vodak and 1/2 cup of Grand Mariner (which is an orange liquor) to the mason jar.
5. There was still a bit of room left over at this point so I topped off the jar with a little Vanilla Vodka.

Let it sit out at room temperature and in about three weeks time the rhubarb will have broken down and/or the color will have leached out of it. You can then strain it and get to mixing it with your favorite summer drink. Go ahead and shake the jar every so often, it should help it break down a little quicker.
(7/2/2012 - Update - You can see the final product here.)

Believe it or not, I still had more rhubarb so I made some compote to go with our French Toast on Sunday morning.

To make compote all you have to do is throw chopped up rhubarb in a pot, cover it with sugar and cook it over medium heat until it turns to mush. Rhubarb is crazy tart so you will have to add more sugar than seems healthy, but you can always add it in small batches until you like the sweet-to-tart ratio. When we still had left over compote after finishing breakfast I put the last of t in a small mason jar and threw it in the freezer. Compote is good for pie filing, over ice cream and makes a yummy addition to french toast or pancakes. 

Have you made anything with rhubarb lately? What is your favorite rhubarb recipe?

Monday, May 7, 2012

Fencing (Out) The Critters

Let the preparation continue! This weekend I gave Chris the mission of fencing off our garden area to keep the critters at bay. So on Saturday morning while I was out for breakfast at Wise Acre in Minneapolis, Chris took measurements of the area and then picked up poultry netting and stakes from the hardware store. Supplies in hand, he set out to complete his wife-appointed mission. (Yes, I am a very lucky lady.)


We haven't had critters problems yet this year, but I've seen more than a few rabbits trolling the neighborhood in my tenure here so we know they are around. Last year we fenced off the garden area with wooden stakes and meshing (as seen below). This worked well enough, but it was no easy task to assemble and it got pretty shabby by the end of the year, so it came down before winter set in.


We are hoping this new fence will have a little more durability. Ideally we won't need to take the fence down for the winter and will be able to consider this task done for a few years. Husband measured out from the beds and staked the four corners. We gave several feet between the beds and the fence, I recommend at least two feet, so you can properly squat in there even where the plants are real big later on the in the summer.


Once the corners were staked it appeared to be a pretty quick process to add additional stakes every four to five feet for support. 


The stakes have little slits in them which are made to hook the poultry netting. Once all the stakes were in around he went with the netting, locking it into place. I don't want to discredit his hard work on this task, but I think even Chris was a little surprised at how quick it went. Arial view anyone?


Perhaps a not so grainy on the ground view would be preferable? Props to the husband for knocking this one out of the park!


However, the story does not end here. Remember how I said we hadn't seen any rabbits yet this year? Turns out, if you build a fence, they will come! Last night I was sitting in the back porch reading when I noticed Luna start to twitch...lo and behold....
Okay, I realize that rabbit is hard to see in the photo. But trust me, it was there, sitting right at the fence line, trying to figure out how to get in. And get in, it did! Yes,  my mesclun greens were attacked last night.

How you ask? Well, last year we put tent stakes into the meshing to hold it tight to the ground so the rabbits couldn't wiggle their way in underneath the fencing. We have every intention of doing it again this year, but we were in no rush to get 'er done as there isn't much going on yet. But with this mornings discovery it looks like we will be doing some staking tonight.

Another strategy for keeping out rabbits is sprinkling human hair at the fence line. We did this last year and it seemed to help, so, if anyone reading this is planning on getting a hair cut soon could you do me a favor and bring over your trimmings? I would really appreciate it. That's not too weird is it?

Friday, May 4, 2012

Friday Room Reveal: Office

Alright, alright. So, I have had (what turns out to be) an overly hopeful plan to give you a whole home tour in a single post. Alas, it turns out, I just don't have the time (or energy?) to make this wondrous post come into existence. The thought of it is too stressful and as a result I have gotten nowhere with the plan.  But the good news is, I have come up with an alternative plan I think we can all be happy with. Single room tours! As as they come into existence I will update the House Tour page of the blog. (Also coming soon!)

Before we begin, I feel the need to say that there is not one room in our house I would consider "finished" or for that matter "mostly finished." All things are a work in progress. This is not to say, things haven't come a long way. But still...you get what I am saying? Okay. With that off my chest. Let us begin, with the office. I choose the office as a starting point because on my very very first post on LH I gave you a sneak peak photo of the office. And it seems fitting to start a series of room tours just as we started the blog together. Remember this photo??


Well, we aren't starting there. (Got'cha!) We are starting a little further back. Originally, this room was a "second guest room/dumping station" -- official title folks! The room came to us with a soft purple color and while it's not my favorite color, it goes with the feel of the upstairs and it's not a bad color. So it stays. But it did require extensive touching up, as the paint job was certifiably sloppy. I also repainted the trim while I was cleaning the edges. I have no photographic examples to share, but it made a huge difference. Never underestimate the paint job!

So walking into the room as it was....
The corner where stuff went to get lost.
Ugh. I promise, we do generally make our beds.


Yeah, it wasn't much. And I confess, I made at least one friend sleep in this sad little room. (Sorry friend, you know who you are!) As it turns out, two guest bedrooms wasn't all the necessary for us. And what we really needed was somewhere to get stuff done. Like work on a computer or sew up a long over due yoga bag for a friends birthday.

Here is how the transformation went.
Step one: Create a pinterest board for inspiration. I was feeling pretty drawn to the wall long desk set up.
Step two: Remove unwanted furniture.
Step three: Clean up the paint job.
Step four: buy and assemble two desks from ikea.

I happened to get a free filing cabinet from work and with that sitting between the two desks we officially had a work space that ran the length of the room. Which brings us to here:


Step Five: Add what you have to walls. The first items to go up on the wall were three old frames I had laying around that I painted white with the same paint I used for the trim. Then because I am location love crazy I traced outlines of the three states This Earth and I have lived in together on some green paper and framed them. Total cost: $0. That is my kinda of art.


Step 6: Organize your space to suite your needs. Since we had two desks I decided one would be my sewing station, and the other for everything else. I think we are ready for the reveal? Yeah?

Please, come in.
The desk you can see from the door way is the everything else desk. 
The far desk is my sewing station. You can see my thread hanging on the wall which is uber convenient to have so close at hand when I am working. Also in this corner I hung up a few items I am particularly fond of.   A painted portrait of my husband that a friend gave to me in college -- long before husband was in my vocabulary. A bird print gifted to me by another dear friend as we left Montana. And the poster for one of the best bands ever!  What I really love about this arrangement is that these items are all creations of friends, it feels inspiring to me to be surrounded by the work of people I love as I endeavor to create something of my own.
Here I offer you a long view of the desk from inside the closet. This is the side of the room that feels in realm of getting close to finished.
The other side of the room serves some practical needs but isn't as "pretty".  
And all the way around the room we have gone...
Behind the door, I have some tools for cutting fabric hanging up on the wall. It's nice to have them in a place that is close at hand but also out of the way.
This other bookshelf was made for me by one of my fathers when I was in the 5th grade. Now it stores project stuff. It is a sentimental piece of furniture. I have lots of those. Not the least of which is the mirror in the room, which was made for me by my Papaw.
So, there you have it. The first of many Luminous Home room reveals. I hope you have enjoyed the tour. Next time you are in this room I am going to put you to work. 

Thursday, May 3, 2012

Get Organized!

I am here to tell you that a single drawer in a state of chaos can actually drive one crazy. It's true. We have one ginormous drawer in our kitchen that holds all of our normal kitchen utensils (like the pizza cutter and spatulas) in addition to all of the odds and ends cooking tools that don't get used so much. To really understand the chaos of it all you should know that this drawer is approximately 2 feet by 2 feet! It's a HUGE drawer. We are constantly digging in here while food is boiling, popping and crackling on the stove; and every time we we risk getting poked stabbed or cut. It's no good, I tell you! Look at this madness:


So I finally bought three small trays from Target to put in the drawer. It's still not exactly the picture of organization but at least now the stuff that we never use can stay buried and the good stuff can can rest on top and when we open the drawer everything stays put, instead of flying all over the pace. This makes my life feel better, more manageable and less chaotic. Maybe that is a lot of credit to give to a drawer but sometimes eliminating the small annoyances in life allows you to see the good stuff a little more clearly. Like where that damn pizza cutter is: front and center off to the left. 

Wednesday, May 2, 2012

Moving Outdoors!

Guess who slept outside last night??


Our seedlings! That's right. I have begun the process of hardening off our transplants. Monday they spent the day on the front porch and then went back to their room for the night (at which point I ever so cruelly took their heat mat away). Last night I decided to bite the bullet and put them out on the back porch to be left out OVER NIGHT! I confess, I was nervous like a parent sending their kids off to their first day of school. But come morning, they were still there and looked pretty damn content to boot.

Truthfully, they didn't really sleep out doors. They slept in the back porch. Where the wind and the critters couldn't get to them. The nice thing about our back porch is that it pretty well serves all the needs of seedling that are being hardened to the inclement weather of Minnesota. It's warmer than being all the way outside, but cooler than the house. There is no danger of frost. And I also don't have to worry about them being directly exposed to the sun for long periods of time because they still have a roof over their heads. You see, they are in a state of transition, too much of the new environment at any one time can make them commit seedling suicide. We don't want that.

Over the next several days I will put the seedling out in the yard for a few hours at a time to get them used to the Sun and the air but they will come back in the porch at night. That is, unless the weather takes an extreme dip in the cold direction, in which case I can still bring them inside. I haven't lost all control...yet!

All of this means, I need to start thinking about how I am going to lay out the garden. Because, folks, it's getting on planting time. How that is too look exactly, I can't say just yet. Check back next week and I just might have a peak for you.

Oh, and get this...our strawberry patch is starting to flower...you know what the means!!!
Answer: STRAWBERRIES!!


Tuesday, May 1, 2012

Power Tools and Never Ending Home Tweaks

I bought a power tool. My first one. Technically, I suppose it is "our" power tool, but I have a feeling that I will be using it more than the hubby will. Are you just dying to know what it is?? Okay, I know you can already see the photo below so I won't try to keep you in suspense. It's a circular sander!


Ain't she cute?? Funny thing is, I have been wanting this little lady for quite some time but I had this idea in my head that since it was a power tool it would be expensive. Not so!! This little cutie was less than $30 and it came with a $7 rebate. So in the end she cost less than we spend on coffee every week.

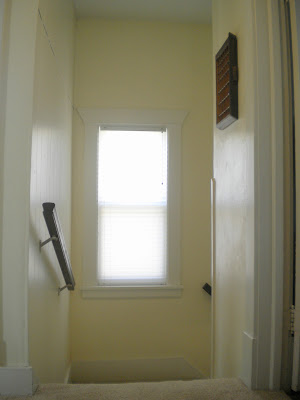
I have a slew of projects in mind where my new circular sander will play a role, front and center, but before I chew off anything too big I thought it would be smart to use her on a smaller project. So, remember this scene??


We all recall what a big improvement this is compared to what it was before...


But still, the number of different wood finishes in this small space felt chaotic. There are two different frames, the white around the window, the dark mahogany of the banister (we stained that last year), and that little table. I love that little corner table, for one, my Papaw made it (that is southern speak for Grandpa) but it also is made of about 8 different woods, which is awesome but as it turns out, not for this space. So we need to make some adjustments to the landing.


This new arrangement, sans table full of stuff, felt a millions times better to me immediately. But then of course as we lived with the adjustment, I felt like there was one more thing I could change. That's when I decided to try out my new sander. See, it's all coming together, sometimes it just takes a little while.

I have gruelingly sanded objects much bigger than this in that past by hand. It was actually shocking how easy this was. Hold the sander over the surface and the finish is removed. No sweat involved. First I sanded the top, then the outer edges and then the inner edges. All in all, this probably took me less than 30 minutes.


Once the sanding was all done and the frame wiped down I needed something to go in the frame that would allow me to spray paint it with out gumming up the slits and grooves that hold everything in place. The obvious choice was using the cardboard that came in the frame. So I went with the obvious choice.


I taped it in place so it wouldn't get all leaky...


And then I applied two coats of primer, two coats of a flat white and finally a coat of clear glossy stuff to make it look all nice and finished.


The entire project was complete in a afternoon. And the end result...well, I think it even makes the poster pop a bit more.


I am quite satisfied...for now anyway...


Please tell, do you have a story about a little tweak that made a big difference?